The Mending Myth: A Repair Need Not Disappear
Visible mending lets a worn country garment keep its character. Choose a patch, stitch and colour that suit the damage and the way you wear it.
Can a mend look deliberate rather than like a failed attempt to hide a hole? Visible mending gives a country garment a repair that belongs to its appearance, while still addressing the damage. The aim is not to decorate every worn patch. It is to make a considered choice about what to show, what to reinforce and how the garment will be used afterwards.
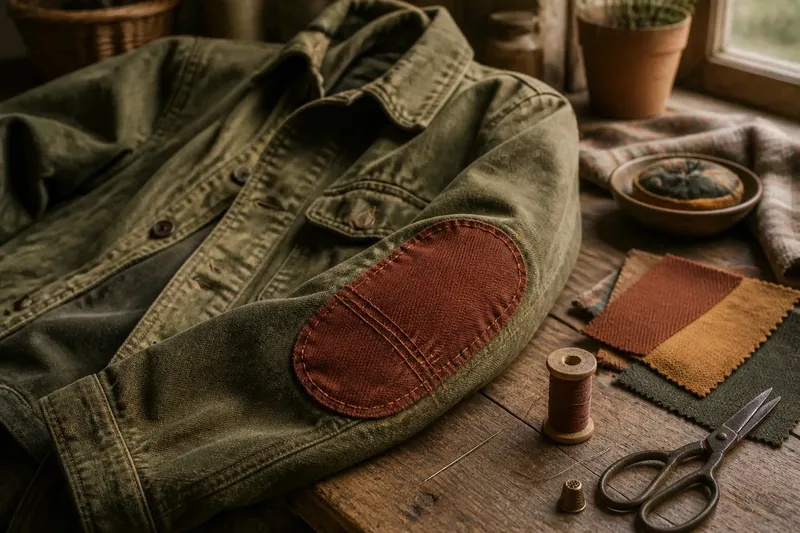
Imagine a hypothetical situation: Mara has an old olive-green cotton chore jacket with a tear at the elbow. The fabric around it is rubbed thin, and a pale, roughly cut patch has already been pinned inside as a temporary measure. She wears the jacket for pottering in a shed and walking to the village, but not for heavy carrying. Rather than attempt an invisible repair, she decides to make the elbow patch a visible feature, using cloth and stitches suited to the jacket’s workwear character.
What should the repair say about the jacket?
Mara begins by asking what the jacket is for, not what a perfect repair is supposed to look like. A mend on a garment worn for muddy jobs may need sturdy coverage and easy washing. One on a jacket kept for errands can be more finely stitched, though it still needs to hold under the movement of the arm. Visible does not mean fragile, and decorative does not mean the repair has to carry more load than the surrounding cloth can bear.
She also considers whether the damage is a single tear or a wider area of fatigue. A neat opening in sound fabric can often be stabilised with a patch and stitching. If the cloth around it is thin, stitching directly along the edge may simply pull at the weakened fibres. Mara’s rubbed elbow needs a patch larger than the tear, so the strain is spread onto stronger cloth.
That distinction is useful beyond jackets. A small, clean split in a shirt can take a discreetly placed darning patch; a thinning knee may call for broader reinforcement. The mend should respond to the condition of the cloth, rather than treating the visible hole as the whole problem.
How does colour turn a patch into a choice?
Mara lays out several scraps beside the jacket in daylight: a deep rust cotton twill, a muted ochre canvas and a dark green cotton from an old work shirt. She is not trying to match the original olive exactly. Instead, she looks for a colour that makes sense beside it and will still look intentional if it fades or picks up dust.
A close colour match can make a patch recede, but it can also draw attention to an imperfect match. A strong contrast announces the repair plainly. A related colour—rust beside olive, for instance—sits between those approaches: noticeable without looking accidental. The best choice depends on whether the wearer wants the patch to lead the eye or settle into the garment.
Texture matters as much as colour. Smooth cloth against a rough jacket can look like a label, while a similar weight and weave often feel more at home. Mara chooses the rust twill because it is sturdy enough for the elbow and its matte surface suits the jacket. She keeps the patch simple, letting the difference in colour do the expressive work.
Think of a patch as a carefully chosen button: it need not be identical to its neighbours, but its scale and character should belong with the rest. Before cutting, she places the scrap over the tear, bends the sleeve and checks the patch from a short distance. It should cover the worn area without making the elbow stiff or crowding a seam.
Which stitches make the repair look intentional?
For Mara’s jacket, a hand-sewn running stitch around the patch edge gives a clear, quiet outline. She uses a strong thread in a deeper rust shade, so the seam is visible but not stark. A second line of stitches across the patch anchors it to sound fabric and gives the repair a little more visual rhythm. The result is not a row of perfect machine-like marks; small variations make it look made by hand.
Other stitches create different effects. A blanket stitch can finish a raw edge and give it a pronounced border. Darning, worked back and forth across a small hole, can form a woven-looking area that blends or contrasts according to the thread. Sashiko-inspired running lines can make a broad reinforcement look patterned, though the density should not turn a flexible part of a garment into a rigid panel.
Before committing, Mara tests a few stitches on a spare scrap of the patch fabric. She checks how the thread sits, whether the cloth puckers and whether she can move a finger comfortably beneath the stitching. This small trial helps her choose a stitch scale that suits both the material and her own sewing rhythm.
What should she check before sewing?
- Extent of wear: Is the hole surrounded by sound cloth, or does the thinning continue beyond it? Make the patch large enough to reach sturdier fabric.
- Garment movement: Does the area bend, stretch or rub against another layer? Keep the repair flexible enough for that movement.
- Patch weight: Does the chosen scrap feel close to the jacket fabric, or could it pull and drag? Avoid a heavy patch on light cloth.
- Raw edges: Will the patch fray? Choose an edge finish, such as turning the edge under or using a suitable binding stitch.
- Thread and needle: Can the needle pass through both layers without excessive force, and does the thread suit the cloth? A scrap test can reveal trouble early.
- Care routine: Will the garment be washed or brushed often? Choose materials and stitches that can live with that routine.
- Placement: Does the repair sit clear of a seam, pocket opening or fastening? Check the garment laid flat and while worn before fixing the patch in place.
For material care, the garment’s care label and the fabric or thread maker’s instructions are the useful references; local rules matter only where they apply. Mara checks the jacket’s label and her thread packet, then decides to keep the patch materials compatible with the jacket’s ordinary care.
What changes when the patch is on the sleeve?
An elbow is a moving surface, so Mara avoids pulling the cloth taut while she works. She smooths the sleeve, centres the patch over the damaged area and pins it without stretching either layer. She tries the jacket on before sewing: the patch stays clear of the seam and does not obstruct her bend at the elbow.
She folds the raw edge of the twill under and presses it lightly, then uses the running stitch to attach the patch. At the worn centre, she adds a few crossing lines to secure the weakened area. She keeps the stitches close enough to hold the cloth but not so tight that the sleeve gathers. After each short section, she lets the sleeve relax and checks that the fabric lies flat.
The first version of the edge looks too crowded to her. She unpicks a short stretch and spaces the stitches more evenly. This is not a demand for machine precision; the correction simply gives the patch a calmer outline. A visible mend benefits from a little editing. Every extra colour or decorative line competes with the jacket, so she keeps the design to one patch, one thread colour and two stitch directions.
What does the finished mend change?
In this invented situation, Mara’s finished jacket still shows the tear’s former location, but the opening is covered and the surrounding elbow is reinforced. The rust patch reads as part of the jacket rather than a temporary fix. When she bends her arm, the sleeve remains comfortable; from across the room, the patch gives the plain olive jacket a distinct point of character.
The repair also changes how she thinks about the garment. She no longer has to judge it against an imagined original condition. Its patch records a useful choice: keep the jacket in circulation, protect a worn area and let the repair be seen. That does not mean every mend needs a story or a contrasting colour. A quiet patch, matching thread or careful darn can be just as deliberate.
Will visible mending suit every garment?
Can a visible patch be used on a delicate fabric?
It can be, but a heavy patch may distort fine cloth or pull at weak fibres. Choose a lightweight material and a gentle stitch, and consider whether a specialist repairer is better suited to a fragile or valuable garment.
Does a colourful mend have to match the rest of an outfit?
No; it only needs to feel like a choice the wearer is happy to repeat. A patch can echo a scarf, a lining or nothing else at all, while remaining a small accent on a work jacket.
Can decorative stitching hold a tear closed?
It may help, if the stitch crosses the damaged area and anchors into sound cloth. Decorative lines alone will not address fabric that has worn thin around a tear, so the patch or reinforcement needs to do that work.
What if the repair comes loose later?
Check the stitches and cloth occasionally, especially after the garment has been worn and washed. If the fabric continues to split or the repair carries a load it cannot safely support, stop using it for that purpose and seek a suitable repair option.
Visible mending is most successful when its appearance follows the garment’s needs: sound cloth beneath the stitches, a patch suited to the fabric and a design the wearer can live with. For Mara, that means an olive jacket with a rust elbow, not a pretend return to newness. The next time the sleeve wears through, she can choose another repair that fits the jacket as it is becoming.